Saturday, April 30, 2011

Overall Monitoring of gPlex Reseller

Some basics and common tips and techniques to monitor gPlex Level-3 / Master reseller or even level-2 or level-1 reseller:

Current Calls:
  • Click on the Current Calls at the bottom of the left side menu to see active or running calls in your reseller.
  • How many calls are currently being connected will be shown (see picture).
  • Click Show details to see more details of every call.


  • After Clicked on Show Details the following screen will appear.
  • Here you will see every active call of your reseller with detail. Record for every call (User, PIN number, Destination number, Call duration etc) will be shown.


Call Summery:
  • Click on Call Summery, total call duration for every destination will shown (see the picture below).
  • Last Day: See previous or last day's call summery.
  • This Week: Call summery of running week (previous 7 days).
  • Customized report: Enter start date and end date to see specific day / days report of Call Summery.


Search Log:
  • Below Home click on the Search Log to see details call log (see the below screen shot).
  • Suppose, you want to see one of previous day's or current days or more than one days details call record for any user's or any PIN number's.
  • Select the reseller from the top or type the PIN number in the provided field.Now enter the beginning date and end date and press Submit button. To see on day's record, type start and end date same. All records of the day / days will shown for the selected user, PIN number, destination, destination number etc.


Reseller Transaction History:
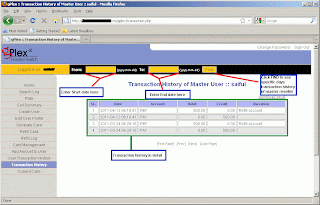
  • Click on the Transaction History. Enter start date and end date in the provided field and press Find. All transaction details of your own reseller will appear. This history can't be edited of changed. In the remarks you will see whatever your provider writes.
  • Date, time, amount, remarks / memo for every payment will be show.

The maintaining process is very easy in gPlex hosted switch. These are most common tips to regular monitoring your own Level-3 / Master reseller. Read other related posts (VoIP Tutorial) in the blog including VSR tutorial also.

Other related posts:
Rate Management in gPlex

Monday, April 25, 2011

Rate management in gPlex

Another important in gPlex reseller account is the Rate Management. Managing rate plan in gPlex is little bit different than typical VSR System (VoIP Switch Reseller System). In gPlex user can't create any rate plan / tariff of his own like VSR. But if Admin add more than one rate plan to resellers account than Master User / Level-3 reseller holder can set more than one rate plan for the same user account by adding ditional prefix.

After reading this post this process will be much easier for any new Level-3 / Master reseller user.

Rate Plan:
  • Click on Rate at the left side navigation menu. The following screen will be shown.
  • At the top you can see how many Rate Plan has been added to your reseller. Select any rate plan.
  • In the list you will see Name, Code, Carrier Rate, Card Rate and Route column.
  • Carrier rate means your current carrier buying rate per minute from your provider. This rate can't be edited from Level-3. And Card rate means your selling rate to your user. This rate can be changed from Master Reseller.
  • Click on Edit to change the Card Rate. And Click on Show to see the route or added destination prefix.
  • You can filter your search to find out desired destination. Enter some of the first letters of the destination in the name field (see top-right side) and press the FILTER button.


Changing Card Rate:
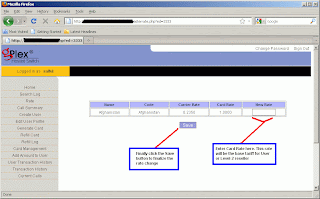
  • After clicking on the Edit link for any destination, the following screen will appear (click to enlarge).
  • In the field New Rate enter new rate for the destination which will be Level-2 / User's base tariff.
  • Finally click on the Save button, changed rate would be saved.


Show Dialing Plan:
  • After clicking on the Show link for any destination you will see a new window like the following picture.
  • Dial Digit means dialing plan (code) for the destination.


Add new rate plan:
  • Click on the Edit User Profile from the left side menu you will see all details of the clicked user. At the bottom of the page beside Rate Plan there's a button "ADD". Click on this to add additional rate plan.
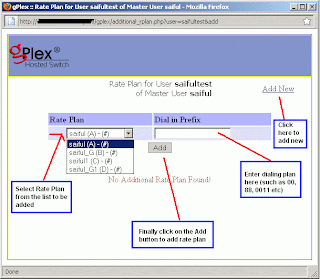
  • Remember the user's default rate plan. Now select other rate plan (See the picture below) except the default.
  • In the Dial in Prefix field enter some prefix. For example, if the default rate plan for Bangladesh is 88 for Rate plan A. Than to add rate plan B as additional plan enter 00 on the Dial in Prefix field and client will dialer 88..... and 0088...... (this way). When they dial with 88 the call will go through Rate plan A and for 0088 the call will go through Rate plan B.
  • After adding new rate plan click on the Add button at the bottom of the page.


For other further details fill free to contact us or if you have any comments just type your comments below, it will be highly appreciated.
Diroo

Other related posts:

Monday, April 18, 2011

Level-2 Reseller or User Management in gPlex

Creating Level-2 reseller or User account in gPlex Switch is easy. Level-2 reseller can be created from Level-3 reseller. Take a look at the following steps:

Creating New User:
  • From your Level-3 homepage click on the Create User link at the left side.
  • Enter all details information in the required fields.
  • On the User field type reseller user name / login.
  • Password and retype Password and Name on the next three fields.
  • Select Account Type - Prepaid or Postpaid.
  • Enable Create Sub User means that you are permission to Level-2 reseller to create Level-1 reseller or Sub user. If you disable it than the user won't be able to create any Level- reseller.
  • Enable Generate card option to give permission to the User to generate new card / PIN.
  • Zero Bill CDR - Keep it Y.
  • Free Seconds - Apply for only when call get connected.
  • Set Pulses (F. ulse, N. Pulse) for the reseller.
  • Provide your user Secret. This secret will be the user's own secret. Provide this secret code to your user that he can create sub user or generate PIN.
  • Finally click on the Create User button to finalize the creation.
(Click on the following screen shot o enlarge)


Edit User Account:
  • Click on Edit User Profile. The following screen will appear.
  • Here you will see the list of all users.
  • Click on the User Name you want to edit.
Here you will see all remaining balance of all user account. Password and Secret for every reseller account can be change from here.


After Clicking on the User Name you will be taken to the following screen.
User Name can't be edited. Except it other information's can be changed. Change whatever you want to. Rate plan can also be change or extra rate plan for same user can be added. Click on the Add button beside Rate Plan. After successful change just click on the Save button at the bottom of the page. All changes will be saved.


Add Balance to User:
Click on Add Amount To User.
  • The following page will shown. At the top f the page select user first which you want to recharge.
  • Enter amount you want to recharge in the Amount field.
  • Enter some Description / Memo / Note in the Narration field.
  • Select Refill type from the below.
  • Finally press the Submit button to add Payment to user.


Transaction History of User:
Click on the User Transaction History.
Select User, Enter Start date, End Date and click FIND button.
All detail transaction history of the selected user fro the date you entered will be shown.


This are the most common basics thing need to create and maintain Level-2 reseller or User account in gPlex Switch reseller sytem.
You can read more basic VoIP Tutorial about VSR System, gPlex Switch etc from the right side of the BLOG. These will help new user's a lot.

More post about gPlex VoIP Tutorial:

Tuesday, April 12, 2011

gPlex Switch Reseller Card Management

Generating, Management, Editing... of card / PIN in gPlex switch's is little bit different than VSR System (VoIP Switch Reseller System). In VSR System PIN number can be generated only in Level-1 but in gPlex Switch Reseller, PIN can generated in Level-1, Level-2 and eve in Level-3 or Master reseller.
The process in gPlex is not so hard, According to my opinion its little bit easy then VSR System. But there's some limitations. In VSR System PIN (both user name and password) can be edited but gPlex PIN can't be edited after generating.

Lets take a look at the whole process. You can see at the right side navigation menu of this blog (VoIP Tutorial section) to see more details about VSR System.

Generate Card in Level-3 reseller:
From your Level-3 / Master reseller Homepage go to the Generate Card section at the left side. The following page will appear (Click to enlarge).
  • Select your User (Level 2) for whom you want to generate card.
  • In the Value of Card field enter the amount of card. Suppose 5 $, 10 $, 50 $ or 100$ etc..
  • Enter the Total number of cards you want to generate.
  • Enter your secret in the Secret field. You will get your reseller account's secret from your provider. Always use the secret of your logged in reseller. If you are generating cards from Level-3 than enter only your level-3 secret.
  • Click the Generate button. Within seconds your desired PINs would be generated. You will see your generated PINs. Remember one thing, your PIN could have only PIN number or even PIN number + Password. If there's only PIN number than use the PIN number as password also. Ask your provider for more details.


Card Management:
Click on the Card Management section of your reseller, you the a page like the following screen shot.
You will see several lot of PINs date wise. The date is when the PINs were generated. User is during generation which reseller you selected. Than you will see No of cards, Total remaining value of cards, Used amount etc.
Click on the date or reseller name to see more details about that Lot.


After clicking on the Date or User name you will see the following screen. Every PIN of that Lot, their Serial number, Balance, Card number, Password, Used amount, remaining amount, Active / Inactive status etc.


How to Recharge or Refill card:
Click on the Refill card section to recharge a PIN or card. The following screen will shown.
Enter the Serial number in the SL field or enter the PIN number in the PIN field. Or even you can enter both of them.
Now press the Next button.


After pressing the Next button you will see the following screen. Here you will see all details about the PIN / Card you want to refill.
Enter the amount you want to recharge in the Refill Amount field.
Enter some narration / notes / memo en the Narration field.
Press the Refill button to finalize the refill. You will a confirmation message on the screen.


Card Refill History:
Click on the Refill Log section at the left side. Enter your PIN number for which you want to see refill history. Enter Start date and End date. and press the search button. You will see details record of the card recharge in row and column.


You can apply the above process for gPlex Level-2 and Level-1 reseller account. I think the process is little bit easier than VSR System. What do you think ? You can submit your comments below. And if you have any kind of questions regarding this matter. feel free to mail me.


Other posts related to that topic
:

Tuesday, April 5, 2011

Level-1 and Level-2 Reseller in gPlex

How to maintain Level-2 reseller and Level-1 reseller in gPlex Switch reseller system, I am going to discuss briefly for new gPlex Switch reseller users and sub-users in this post. Some basics about how to monitoring Reseller account will be discuss also.


gPlex Reseller Level-2 / User:
  • Type your level-2 login address (for gPlex every level has different login address) in the address bar of your browser and press ENTER.
  • The following page will appear (follow the screen shot).
  • Enter your User name in the User field.
  • Enter your Password in the Password field and press the Submit button.
  • You will enter your Level-2 reseller Homepage.


User / Level 2 reseller Homepage:
Take a look at the following screen shot (Click on this picture to enlarge). At homepage you will see Today's Report and Account Status. In Today's report you will see your total Sub users (level-1) total calls duration, revenue, reseller costs, ASR (Average Success Rate), ACD (Average Call Duration). You can see previous day's report or before that day's report or even report of last week or as you like. In the Account Status your will see your own account balance, Used balance, remaining balance etc.
Take a look at the left side navigation menu.
  • Rate: Click to see the your reseller rate plan.
  • Card Management: Click to see your generated cards, add balance to card, lock or unlock card.
  • Create Sub user: Level-1 reseller or Sub-user can be created from here.
  • Sub User List: List of all created Sub-user or Level-1 reseller account.
  • Refill to Sub User: Add amount or balance to sub user.
  • Sub User Transaction: To see details payment history of Level-1 user.
  • Generate Card: New Card generation
  • Refill Card: Refill or recharge specific card / PIN.
  • Refill Log: Card refill / recharge history.
  • Transaction History: Your Reseller Level-2 transaction / Payment history.
  • Current Calls: Click to see current active calls with details.


gPlex Reseller Level-1 / Sub User:
  • Type your level-1 Login address (for gPlex every level has different login address) in the address bar of your browser and press ENTER.
  • The following page will appear (follow the screen shot).
  • Enter your Sub-user Name in the User field.
  • Enter your Password in the Password field and press the Submit button.
  • Your Level-1 reseller Homepage will appear.


Sub User / Level 1 reseller Homepage: 
Take a look at the following screen shot (Click on this picture to enlarge). After logged in your homepage you will see Today's Report and Account Status. In Today's report you will see no of total calls, total minute, bill, ASR (Average Success Rate), ACD (Average Call Duration). You can see previous day's report or before that day's report or even report of last week or as you like. In the Account Status your will see your own account balance, Used balance, remaining balance and Status (Active / Inactive).
Take a look at the left side navigation menu.
  • Report: Click to see see report of daily usage.
  • Rate: Click to see the your reseller rate plan.
  • Generate Card: New Card / PIN generation
  • Card Management: Click to see your generated cards, add balance to card, lock or unlock card.
  • Refill Card: Refill or recharge specific card / PIN.
  • Refill Log: Card refill / recharge history.
  • Transaction history: Your Reseller Level-1 transaction / Payment history.


Other related post:

Share/Bookmark