Another important in gPlex reseller account is the Rate Management. Managing rate plan in gPlex is little bit different than typical VSR System (VoIP Switch Reseller System). In gPlex user can't create any rate plan / tariff of his own like VSR. But if Admin add more than one rate plan to resellers account than Master User / Level-3 reseller holder can set more than one rate plan for the same user account by adding ditional prefix.
After reading this post this process will be much easier for any new Level-3 / Master reseller user.
Rate Plan:
- Click on Rate at the left side navigation menu. The following screen will be shown.
- At the top you can see how many Rate Plan has been added to your reseller. Select any rate plan.
- In the list you will see Name, Code, Carrier Rate, Card Rate and Route column.
- Carrier rate means your current carrier buying rate per minute from your provider. This rate can't be edited from Level-3. And Card rate means your selling rate to your user. This rate can be changed from Master Reseller.
- Click on Edit to change the Card Rate. And Click on Show to see the route or added destination prefix.
- You can filter your search to find out desired destination. Enter some of the first letters of the destination in the name field (see top-right side) and press the FILTER button.
Changing Card Rate:
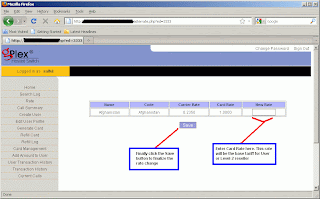
- After clicking on the Edit link for any destination, the following screen will appear (click to enlarge).
- In the field New Rate enter new rate for the destination which will be Level-2 / User's base tariff.
- Finally click on the Save button, changed rate would be saved.
Show Dialing Plan:
- After clicking on the Show link for any destination you will see a new window like the following picture.
- Dial Digit means dialing plan (code) for the destination.
Add new rate plan:
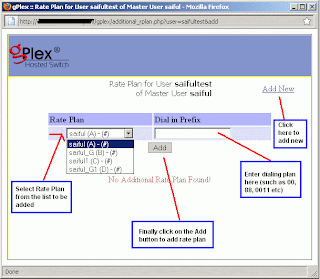
- Click on the Edit User Profile from the left side menu you will see all details of the clicked user. At the bottom of the page beside Rate Plan there's a button "ADD". Click on this to add additional rate plan.
- Remember the user's default rate plan. Now select other rate plan (See the picture below) except the default.
- In the Dial in Prefix field enter some prefix. For example, if the default rate plan for Bangladesh is 88 for Rate plan A. Than to add rate plan B as additional plan enter 00 on the Dial in Prefix field and client will dialer 88..... and 0088...... (this way). When they dial with 88 the call will go through Rate plan A and for 0088 the call will go through Rate plan B.
- After adding new rate plan click on the Add button at the bottom of the page.
For other further details fill free to contact us or if you have any comments just type your comments below, it will be highly appreciated.
Diroo
Diroo
Other related posts:


Thank's very helpful
ReplyDelete