Showing posts with label Gplex. Show all posts

Wednesday, October 5, 2011

Basics of VOS 3000 : Part -1

In VOS3000, most data managements can be completed through sheets. Sheets can be opened by double-clicking corresponding nodes in (navigation). The following operations are supported:
  • Filter: Get current configuration from server.
  • Copy: Copy the currently selected sheet line into the clipboard.
  • Paste: Paste the line in the clipboard into a sheet with the same type.
  • Insert: Insert new lines.
  • Delete: Delete sheet lines. If the data are at the server, the selected lines will be marked as “to be deleted”.
  • Apply: Send currently specified operations (such as insertion, deletion and modification) to the server to carry out. (*** Before clicking “apply”, all the operations of data are saved only at the client end and will not affect the server-end data; closing the management page would discard these operations)
  • Export: Export the current sheet into local files.
  • Import: Import data from local files into the sheet (supported by a few types of sheets) Batch data operations can be fulfilled by “copy”, “paste”, and column “fill-down” functions supported by spreadsheets in VOS3000. See the illustration below:


Login:
After downloading the VOS3000 install the software in your computer.
 
Upon running VOS3000 client, the login dialogue box will be shown.
  • Server IP: IP address of the remote server.
  • User Name: User names allowed by the platform.
  • Password: User password allowed by the platform.

The system will record IP addresses typed by users for later use. Users can also delete this historical server IP. The initial User Name and Password are both admin.


After Login:
After successful logged in the opening screen will appear (Click the below picture to enlarge).

At the left side navigation menu you will see the following options:
  • Rate Management
  • Package Management
  • Account Management
  • Operation Management
  • Audio Management
  • Data Query
  • CDR Analysis
  • Cards Management
  • System Management
  • Number Management


At the top you will see the Menu Bar. The functions in the Menu Bar can also be found in the Navigation Menu. These Are:

System
Operation Management
Audio Management
Data Query
CDR Analysis
Cards Management
System Management
Number Management

On the Tools Bar you will also find the following options:
Open
Filter
Copy
Paste
Delete
Apply
Export
Import

Related Story:

Monday, April 25, 2011

Rate management in gPlex

Another important in gPlex reseller account is the Rate Management. Managing rate plan in gPlex is little bit different than typical VSR System (VoIP Switch Reseller System). In gPlex user can't create any rate plan / tariff of his own like VSR. But if Admin add more than one rate plan to resellers account than Master User / Level-3 reseller holder can set more than one rate plan for the same user account by adding ditional prefix.

After reading this post this process will be much easier for any new Level-3 / Master reseller user.

Rate Plan:
  • Click on Rate at the left side navigation menu. The following screen will be shown.
  • At the top you can see how many Rate Plan has been added to your reseller. Select any rate plan.
  • In the list you will see Name, Code, Carrier Rate, Card Rate and Route column.
  • Carrier rate means your current carrier buying rate per minute from your provider. This rate can't be edited from Level-3. And Card rate means your selling rate to your user. This rate can be changed from Master Reseller.
  • Click on Edit to change the Card Rate. And Click on Show to see the route or added destination prefix.
  • You can filter your search to find out desired destination. Enter some of the first letters of the destination in the name field (see top-right side) and press the FILTER button.


Changing Card Rate:
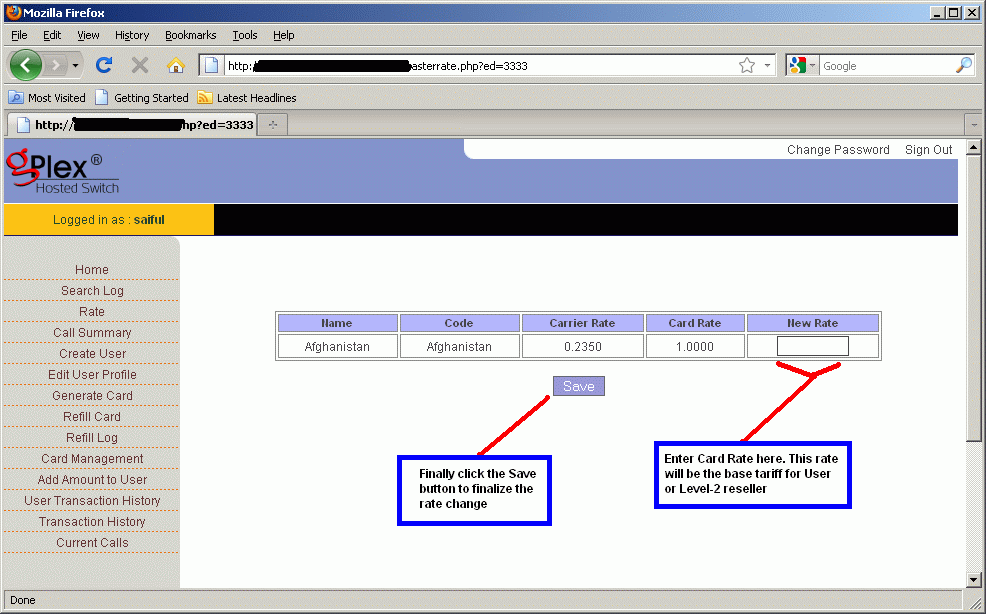
  • After clicking on the Edit link for any destination, the following screen will appear (click to enlarge).
  • In the field New Rate enter new rate for the destination which will be Level-2 / User's base tariff.
  • Finally click on the Save button, changed rate would be saved.


Show Dialing Plan:
  • After clicking on the Show link for any destination you will see a new window like the following picture.
  • Dial Digit means dialing plan (code) for the destination.


Add new rate plan:
  • Click on the Edit User Profile from the left side menu you will see all details of the clicked user. At the bottom of the page beside Rate Plan there's a button "ADD". Click on this to add additional rate plan.
  • Remember the user's default rate plan. Now select other rate plan (See the picture below) except the default.
  • In the Dial in Prefix field enter some prefix. For example, if the default rate plan for Bangladesh is 88 for Rate plan A. Than to add rate plan B as additional plan enter 00 on the Dial in Prefix field and client will dialer 88..... and 0088...... (this way). When they dial with 88 the call will go through Rate plan A and for 0088 the call will go through Rate plan B.
  • After adding new rate plan click on the Add button at the bottom of the page.


For other further details fill free to contact us or if you have any comments just type your comments below, it will be highly appreciated.
Diroo

Other related posts:

Monday, April 18, 2011

Level-2 Reseller or User Management in gPlex

Creating Level-2 reseller or User account in gPlex Switch is easy. Level-2 reseller can be created from Level-3 reseller. Take a look at the following steps:

Creating New User:
  • From your Level-3 homepage click on the Create User link at the left side.
  • Enter all details information in the required fields.
  • On the User field type reseller user name / login.
  • Password and retype Password and Name on the next three fields.
  • Select Account Type - Prepaid or Postpaid.
  • Enable Create Sub User means that you are permission to Level-2 reseller to create Level-1 reseller or Sub user. If you disable it than the user won't be able to create any Level- reseller.
  • Enable Generate card option to give permission to the User to generate new card / PIN.
  • Zero Bill CDR - Keep it Y.
  • Free Seconds - Apply for only when call get connected.
  • Set Pulses (F. ulse, N. Pulse) for the reseller.
  • Provide your user Secret. This secret will be the user's own secret. Provide this secret code to your user that he can create sub user or generate PIN.
  • Finally click on the Create User button to finalize the creation.
(Click on the following screen shot o enlarge)


Edit User Account:
  • Click on Edit User Profile. The following screen will appear.
  • Here you will see the list of all users.
  • Click on the User Name you want to edit.
Here you will see all remaining balance of all user account. Password and Secret for every reseller account can be change from here.


After Clicking on the User Name you will be taken to the following screen.
User Name can't be edited. Except it other information's can be changed. Change whatever you want to. Rate plan can also be change or extra rate plan for same user can be added. Click on the Add button beside Rate Plan. After successful change just click on the Save button at the bottom of the page. All changes will be saved.


Add Balance to User:
Click on Add Amount To User.
  • The following page will shown. At the top f the page select user first which you want to recharge.
  • Enter amount you want to recharge in the Amount field.
  • Enter some Description / Memo / Note in the Narration field.
  • Select Refill type from the below.
  • Finally press the Submit button to add Payment to user.


Transaction History of User:
Click on the User Transaction History.
Select User, Enter Start date, End Date and click FIND button.
All detail transaction history of the selected user fro the date you entered will be shown.


This are the most common basics thing need to create and maintain Level-2 reseller or User account in gPlex Switch reseller sytem.
You can read more basic VoIP Tutorial about VSR System, gPlex Switch etc from the right side of the BLOG. These will help new user's a lot.

More post about gPlex VoIP Tutorial:

Tuesday, April 12, 2011

gPlex Switch Reseller Card Management

Generating, Management, Editing... of card / PIN in gPlex switch's is little bit different than VSR System (VoIP Switch Reseller System). In VSR System PIN number can be generated only in Level-1 but in gPlex Switch Reseller, PIN can generated in Level-1, Level-2 and eve in Level-3 or Master reseller.
The process in gPlex is not so hard, According to my opinion its little bit easy then VSR System. But there's some limitations. In VSR System PIN (both user name and password) can be edited but gPlex PIN can't be edited after generating.

Lets take a look at the whole process. You can see at the right side navigation menu of this blog (VoIP Tutorial section) to see more details about VSR System.

Generate Card in Level-3 reseller:
From your Level-3 / Master reseller Homepage go to the Generate Card section at the left side. The following page will appear (Click to enlarge).
  • Select your User (Level 2) for whom you want to generate card.
  • In the Value of Card field enter the amount of card. Suppose 5 $, 10 $, 50 $ or 100$ etc..
  • Enter the Total number of cards you want to generate.
  • Enter your secret in the Secret field. You will get your reseller account's secret from your provider. Always use the secret of your logged in reseller. If you are generating cards from Level-3 than enter only your level-3 secret.
  • Click the Generate button. Within seconds your desired PINs would be generated. You will see your generated PINs. Remember one thing, your PIN could have only PIN number or even PIN number + Password. If there's only PIN number than use the PIN number as password also. Ask your provider for more details.


Card Management:
Click on the Card Management section of your reseller, you the a page like the following screen shot.
You will see several lot of PINs date wise. The date is when the PINs were generated. User is during generation which reseller you selected. Than you will see No of cards, Total remaining value of cards, Used amount etc.
Click on the date or reseller name to see more details about that Lot.


After clicking on the Date or User name you will see the following screen. Every PIN of that Lot, their Serial number, Balance, Card number, Password, Used amount, remaining amount, Active / Inactive status etc.


How to Recharge or Refill card:
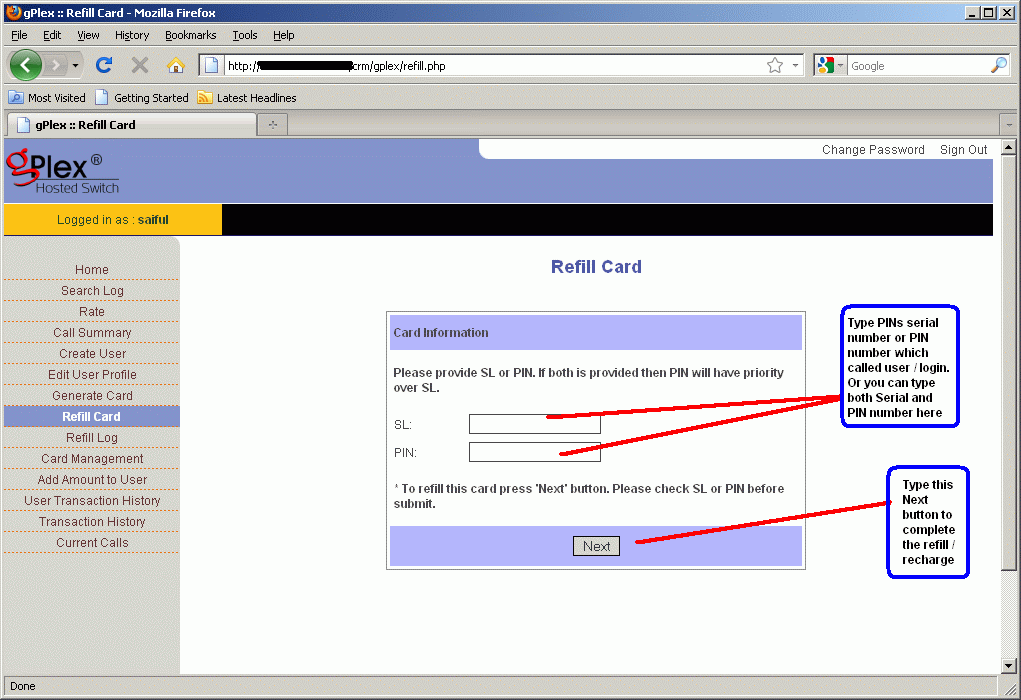
Click on the Refill card section to recharge a PIN or card. The following screen will shown.
Enter the Serial number in the SL field or enter the PIN number in the PIN field. Or even you can enter both of them.
Now press the Next button.


After pressing the Next button you will see the following screen. Here you will see all details about the PIN / Card you want to refill.
Enter the amount you want to recharge in the Refill Amount field.
Enter some narration / notes / memo en the Narration field.
Press the Refill button to finalize the refill. You will a confirmation message on the screen.


Card Refill History:
Click on the Refill Log section at the left side. Enter your PIN number for which you want to see refill history. Enter Start date and End date. and press the search button. You will see details record of the card recharge in row and column.


You can apply the above process for gPlex Level-2 and Level-1 reseller account. I think the process is little bit easier than VSR System. What do you think ? You can submit your comments below. And if you have any kind of questions regarding this matter. feel free to mail me.


Other posts related to that topic
:

Tuesday, April 5, 2011

Level-1 and Level-2 Reseller in gPlex

How to maintain Level-2 reseller and Level-1 reseller in gPlex Switch reseller system, I am going to discuss briefly for new gPlex Switch reseller users and sub-users in this post. Some basics about how to monitoring Reseller account will be discuss also.


gPlex Reseller Level-2 / User:
  • Type your level-2 login address (for gPlex every level has different login address) in the address bar of your browser and press ENTER.
  • The following page will appear (follow the screen shot).
  • Enter your User name in the User field.
  • Enter your Password in the Password field and press the Submit button.
  • You will enter your Level-2 reseller Homepage.


User / Level 2 reseller Homepage:
Take a look at the following screen shot (Click on this picture to enlarge). At homepage you will see Today's Report and Account Status. In Today's report you will see your total Sub users (level-1) total calls duration, revenue, reseller costs, ASR (Average Success Rate), ACD (Average Call Duration). You can see previous day's report or before that day's report or even report of last week or as you like. In the Account Status your will see your own account balance, Used balance, remaining balance etc.
Take a look at the left side navigation menu.
  • Rate: Click to see the your reseller rate plan.
  • Card Management: Click to see your generated cards, add balance to card, lock or unlock card.
  • Create Sub user: Level-1 reseller or Sub-user can be created from here.
  • Sub User List: List of all created Sub-user or Level-1 reseller account.
  • Refill to Sub User: Add amount or balance to sub user.
  • Sub User Transaction: To see details payment history of Level-1 user.
  • Generate Card: New Card generation
  • Refill Card: Refill or recharge specific card / PIN.
  • Refill Log: Card refill / recharge history.
  • Transaction History: Your Reseller Level-2 transaction / Payment history.
  • Current Calls: Click to see current active calls with details.


gPlex Reseller Level-1 / Sub User:
  • Type your level-1 Login address (for gPlex every level has different login address) in the address bar of your browser and press ENTER.
  • The following page will appear (follow the screen shot).
  • Enter your Sub-user Name in the User field.
  • Enter your Password in the Password field and press the Submit button.
  • Your Level-1 reseller Homepage will appear.


Sub User / Level 1 reseller Homepage: 
Take a look at the following screen shot (Click on this picture to enlarge). After logged in your homepage you will see Today's Report and Account Status. In Today's report you will see no of total calls, total minute, bill, ASR (Average Success Rate), ACD (Average Call Duration). You can see previous day's report or before that day's report or even report of last week or as you like. In the Account Status your will see your own account balance, Used balance, remaining balance and Status (Active / Inactive).
Take a look at the left side navigation menu.
  • Report: Click to see see report of daily usage.
  • Rate: Click to see the your reseller rate plan.
  • Generate Card: New Card / PIN generation
  • Card Management: Click to see your generated cards, add balance to card, lock or unlock card.
  • Refill Card: Refill or recharge specific card / PIN.
  • Refill Log: Card refill / recharge history.
  • Transaction history: Your Reseller Level-1 transaction / Payment history.


Other related post:

Wednesday, March 30, 2011

gPlex Hosted SoftSwitch Master Reseller Basics

One of the scalable and comprehensive SoftSwitch in the market to handle VoIP (Voice over Internet Protocol) call termination is gPlex Hosted SoftSwitch.

In this post I am going to discuss some common and important basics about Master / Level-3 Reseller of gPlex Switch Reseller System.

gPlex Login:
Click the following screen shot to enlarge. Type your reseller link or IP in the browser address bar and press enter. Type your Master Reseller accounts correct User name, Password and press Submit button or enter.


Changing Password:
  • After logged in using your user name & password click on the Change Password link at the top-right corner of your reseller homepage.
  • Change your password providing your old and a new password.
  • Click on the picture below to see how.


Master Reseller Homepage:
After logged in to your reseller account you will see a page like the following screen shot.
Total number of your active user's (Level-2), their call history, revenue, reseller cost, ASR (Average Success Rate), ACD (Average Call Duration) etc will shown on Homepage.

  • Last Day: You can see last day reports clicking on the Last Day link, Previous one week report, Specific day or others.
On the left side navigation menu:
  • Search Log: Click on Search Log to see detail calls history of your users.
  • Rate: Below Search Log click on the Rate to see your Base Tariff (carrier rate). You can edit your Card Rate here. The rate plan section in gPlex is different than VSR System.
  • Call Summery: Click here to see daily call summery to various destinations. You can see previous days history too.
  • Create user: To add new User (Level-2 reseller account) click here.
  • Edit User Profile: To edit existing user, Making it active / inactive, Changing Password / Secret or changing some other options about reseller click here.
  • Generate Card: Click on this link to generate new PIN / Card number.
  • Refill Card: To refill or add balance to any generated Card / PIN number.
  • Refill Log: Refill / Payment history of your Cards / PINs. Click on this link and select the "from" and "to" date and press Show.
  • Card Management: Click on this link to see all your resellers (user / level 2) Card number.
  • Add Amount to user: Click to add amount or balance to your user.
  • User Transaction history: Level-2 reseller account payment history, you can see date wise.
  • Transaction History: This link will tell you your total payment record that your provider gave you.
  • Current Calls: This is link that you can see your current reseller calls.


Related posts:

Tuesday, March 15, 2011

Monitoring VoIP Switch Reseller Level - VSR

If you want to run your VSR Reseller account you need to monitor it regularly. In this post I will discuss about some basic and important monitoring operations for VoIP Switch Reseller program (Level-3 and Level-2). For those who are new to VSR System and getting some interests to reading this post are requested to read VSR Basics.

The below screen shot is of Reseller Level-3 or Level-2 homepage. Click on the picture below to enlarge it and understand more details..


Active Calls:
Click on the Active Calls link from the left side menu. You will see the total number of concurrent calls including destination number, origination reseller and PIN, Total talk time etc. Click on the blue color REFRESH button at the right side, every time the page will updated.


Base Tariff:
Click on the Base Tariff link to see your buying rate of your voice carrier (route, minute etc). You will see all destinations including Name, Prefix, Rate per minute, and some other info. Check regularly weather your provider has updated it or not.


Changing Rate / Tariff
Its better to create different rates for different users. Since you are going to do some business with this, I think !
After creating a new tariff click on the tariff name at left side. Page like the following screen shot will appear. Click on the ADD button to add new destination. 
To change any rate just click on the destination name, another new page will appear.


Changing Properties:
You will see different fields including Destination description/name, Rate per minute, Prefix etc. you can edit all these fields. After changing the properties click on OK button at the below of the page.


Add Payment on Reseller:
After clicking on the Show link below "Reseller" a page including the list of all resellers. Click on the reseller Login name.


Click on the Add Payment Button. A new window will appear, enter your amount, type, date, description  and press Add button. Than click on Close.


Own payment history
On the homepage there is a link named Payment History. Click on that link to see total payment history of your own reseller. How much your provide gave you, when etc. You can see payment report for specific time. Enter "from" and "to" date correctly and press Apply button.


Read other related to VSR System:
Create Single and Multiple GK/Register Clients
Create Single and Multiple PC to Phone Clients

Tuesday, March 8, 2011

Creating GK / Register Clients in VSR System

Creating GK / Register Clients for Mobile Dialer in VSR System is same as creating PC2Phone Clients. This topic will cover and give you a basic idea about how to generate single or multiple PIN / Gk Register clients.

First Log into your reseller level-1 homepage.
If you already read my previous post about how to create PC2Phone clients, than it will be easy for you because its same.


Reseller Level-1 Homepage:


Single Mobile dialer PIN / GK Register client:
  • Click the following screen shot to enlarge. Log into your VSR reseller account.
  • To create a single GK / register client click on the Add link below "GK / Register Clients".
  • A new page will appear.
  • In the Login field, type a number or character or both (This will be PIN login/user).
  • In the Password field type your PIN password.
  • Select Tariff (you can create new tariff or use your base tariff).
  • Select the Active Check Box to activate the PIN.
  • Click on OK button to complete the generation process.


Multiple PIN or GK/Register Clients:
  • You can generate multiple Mobile Dialer PIN or GK/Register Clients using this method. At a time you can generate 50 / 100 or more no of PINs.
  • Go to the reseller Homepage. Click on Add Lot link below "Account Generation". The following page will appear. See the below screen shot for more details.
  • Fill up all required fields.
  • Write Description of the Lot. Enter total Number of clients (how many PIN you want to generate).
  • Enter Starting serial (usually 1). Select GK/Register Clients.
  • Select your tariff.
  • Enter Amount (the provided amount will same for every PIN).
  • Now enter Login details (starting character, total number of character etc.). Select the appropriate check boxes if needed.
  • Enter Password details (starting characters, total number of clients etc).
  • In the connection settings option select SIP or H323.
  • After completing all the required fields just simply click on OK button at the bottom of the page.
  • Your desired number of PIN's will be generated. Now activate all the PINs by clicking on Activate button or you can activate single PIN individually by clicking on the PIN's Login name.


How to recharge and activate PIN:
  • Go to your reseller Homepage.
  • Click on the Show link below GK / Register Clients.
  • You will see all generated PIN / Clients.
  • See the below Picture, here only one PIN is shown because there is only one generated PIN.
  • Now click on the Login name of the PIN. you will see all details about the PIN including Login, Password, Calls limit, Balance etc.
  • Click on the red color Add Payment button to add balance on the selected PIN.
  • Remember if you already added amount during PIN or Lot generation than you don't need to add any initial payment.
  • You will see a Active check box, by clicking on this box you can activate or inactive the PIN.


Another client type is Common Clients. This type of PIN can be used both in Mobile dialer and PC Dialer. The generating method is same as PC to Phone Clients or GK/Register Clients.

Anyway,
if you want to know further details about VoIP Switch Reseller System or if you have any comments just write your comments. It will be highly appreciated. Keep reading regularly this blog, more details posts about VSR System and gPlex Switch reseller system will be posted soon.


Read other related post on this blog:
Basics about VSR System
How to create reseller level in VSR System
Create Single and Multiple PC to Phone Clients

Monday, February 28, 2011

How to create New Reseller Level-2 or Level-1 in VSR System

In my previous post VSR (VoIP Switch Reseller) - Level Basics  I have discussed briefly about some of the most common and basic operations of VSR System (VoIP Switch Reseller System). This post would help any beginner who are new to VSR System.

Today in this post I am going to discuss how to create new Level-2 or Level-1 reseller using VSR System. Level-2 can be created from Level-3 and Level-1 from Level-2. The process for L2 and L1 is same. So, this tutorial will help you hunting two birds using one bullet!

Take a look at the Screen shot of VSR Level-3 homepage for some basic ideas:


Add Tariff:
To create a new reseller at first you must create a new tariff which you can modify yourself. Just click on the Add Tariff link to add a new one. Adding a new tariff is very important, because you can create different tariff for different user / reseller. It will help you to modify easily individual clients tariff.
After clicking on Add tariff link a new page will appear containing Add Tariff heading. Just fill up the all required fields and click OK. You can define Pulse, Free minute, Add Surcharge etc here. After clicking on the OK button a new tariff will be added. See the following screen shot to get more idea. Click on the picture below to enlarge.


Adding Tariff Destinations or Properties in VSR:
Now add tariff properties (destinations) to your new added tariff. Click on the new tariff you made from the left side menu. Click Add.. details of tariff properties will appear. Add destination details (description, rate, pulse etc) and click OK. You can add more destinations depending on your Base Tariff or you can upload all destinations at same time by clicking on the Import link. Before import you must Export all the destinations and and save the file in you computer. Than you can edit all destinations. Its an easy process.


Add Reseller in VSR:
Now its time to add a new Reseller. Click on Add Reseller link on the Home Page. The following page will appear. Type reseller Login, Password, Identifier and fill up all the required fields. Select tariff from the right side. Select client type, you can select more than one (GK Register, Pc2Phone, Common Client etc..). Select the Active check box to activate the reseller. Below the tariff selection enter Clients limit. It can be 100000 / 999999 or more or any other amount. After filling up all he required fields click OK. Your new reseller will be added.


Add Balance:
The reseller is ready now. Now from the Home page click on the Show Reseller link. You will see the VSR reseller you created. Follow the following screen shot. Click on the reseller login name to add balance.


Click on the red color Add Payment button (highlighted) to add balance to the reseller. A new window will appear like the following screen shot.


After clicking on the Add Payment button the following window will appear. Write the Amount, select Type (prepaid / return), and enter description and press the Add button. Given amount will be added to the VSR reseller. Isn't it easy ?


I think this process will help you a lot, if you are a new VSR user. If you have further question you can mail me. mail1,  mail2


Other related and helpfull turorial:
Basics about VSR System
Create Single and Multiple GK/Register Clients
Create Single and Multiple PC to Phone Clients
Monitoring VSR Reseller
How to Add IP in VSR GW account

Share/Bookmark